New Feature: Custom SQL Reports

We are excited to announce a new feature enhancement that will allow you to create custom SQL reports in our system. This feature will enable you to query data from various sources and generate reports that suit your specific needs.

What is a Custom SQL Report?

A custom SQL report is a report that you can create by writing your own SQL queries. SQL stands for Structured Query Language and it is a standard language for accessing and manipulating data in databases. By using SQL, you can select, filter, sort, group, and aggregate data from different tables and views.

A custom SQL report can be useful when you want to:

  • Analyze data that is not available in the predefined reports
  • Combine data from different sources or applications
  • Perform complex calculations or transformations on data
  • Customize the layout or format of the report

How to Create a Custom SQL Report?

To create a custom SQL report, follow these steps:

  1. Go to System Management/Document Template Management
  2. Select Type = SQL
  3. Write your SQL query in the Query box. You can only use SELECT statements. Do not use INSERT, UPDATE, DELETE, or other commands that can modify data as they will generate an error.
  4. Click Save

How to Access a Custom SQL Report?

To access a custom SQL report, follow these steps:

  1. Go to the Navigation pane
  2. Select the name of your saved your report under Custom Reports
  3. Click on your report name
  4. If your report has filters, enter values for them and click Filter
  5. View your report on the screen or export it as a CSV file

How to Limit Access to a Custom SQL Report?

To limit access to a custom SQL report, follow these steps:

  1. Go to System Management/Document Template Management
  2. Select Type = SQL
  3. Find your report and click Edit
  4. In the Access Groups box, enter the permission groups that are able to view the report
  5. Click Save

Only members of those groups will be able to see and run your report.

We hope this feature enhancement will help you create more powerful and customized reports in our system.

Thank you for using our system!

New Module: HUD Approved CMS

We are excited to announce that Client Support Software’s CMS for housing counseling agencies, has been approved by the U.S. Department of Housing and Urban Development (HUD) as a HUD certified Housing Counseling CMS, compatible with the Agency Reporting Module version 6 (ARMv6) specification.

This means that the CMS meets HUD’s standards for collecting, storing, and reporting data on housing counseling services provided by HUD-approved agencies. Agencies using Client Support Software’s CMS can easily transmit their data to HUD’s Housing Counseling System (HCS) using XML format, without any manual entry or conversion.

CMA is designed to help housing counselors deliver high-quality and efficient services to their clients. With Client Support Software, you can:

  • Manage client intake, assessment, action plan, follow-up, and outcome tracking
  • Generate customized reports for internal and external use
  • Automate reminders, notifications, and referrals
  • Integrate with third-party applications such as credit reports, messaging services, and online education platforms
  • Access it from any device with an internet connection

Client Support Software’s CMS is also affordable and flexible. You can choose from different pricing plans based on your agency size and needs. You can also customize the CMS to fit your agency’s workflow and preferences.

If you are interested in learning more about how our CMS can help your Housing Agency, please schedule a demo by clicking on the Schedule a Demo button on our website.

We look forward to helping you achieve your housing counseling goals with Client Support Software!

New Feature: Auto-link Clients with a Marketing Campaign based on CallerID

We are excited to announce a new feature enhancement for the CMA: Campaign Phone Tagging. This feature allows you to specify a phone number for each campaign you create in the CMA. A campaign tracks the source of Leads.

If you set a campaign phone, when a CallLog record is imported, the CMA will look up the most recent campaign whose phone matches the CallLog DID (Direct Inward Dialing). When the CallLog is linked with a Client, if the Client Campaign is empty, the Client’s campaign is updated.

This feature will help you track and measure the performance of your campaigns more easily and accurately. You will be able to see which campaigns are generating more calls, leads, sales, or revenue. You will also be able to segment your clients by campaign and tailor your communication accordingly.

To use this feature, you need to create a new campaign or edit an existing one in the CMA. You will see a new field called Campaign Phone where you can enter a valid phone number that you own or have access to. You can also use a 10-digit long code phone number (10DLC).

The CallLog Detail report and the Campaign report have been updated to display new columns related to this feature. You can now see the Campaign Phone, CallLog DID, and Client Campaign fields in these reports.

We hope you enjoy this new feature enhancement and find it useful for your business goals. If you have any questions or feedback, please contact us.

Default Bank Algorithm and NSF Fees

There is a new Setting key: NSF_FEE_STATE_FIELD which allows specifying which field is used to determine NSF fees that are applied when importing an ACH Failure file. Either clientAddressOrigState (the contract state) or clientAddressState (the client’s current state) can be specified.

There is a new Company field that allows selection of the Default Bank Algorithm to use when determining which Bank payments should be linked with.

Default Bank AlgorithmDescription
DefaultThe State Default Banks rule is ONLY applied if both the clientAddressOrigState and clientAddressState match. (If the Contract state matches the Client’s current address)
OriginalStateApply rules based on clientAddressOrigState (the Contract Address State)
CurrentStateApply rules based on clientAddressState (the Client’s current Address State)

Accounting Enhancements

Based on feedback, several small changes have been made to improve the Accounting experience. Many of the smaller changes are listed within the CMA internal Changelog.

Notable changes include:

  • The Client Payment and Disbursement tabs can be exported to a CSV file.
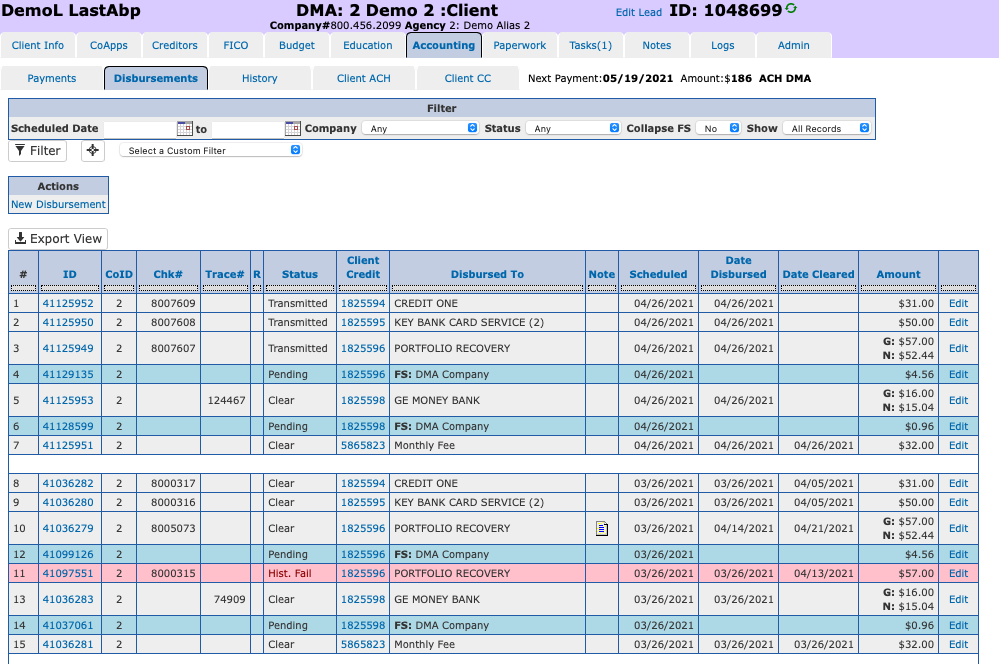
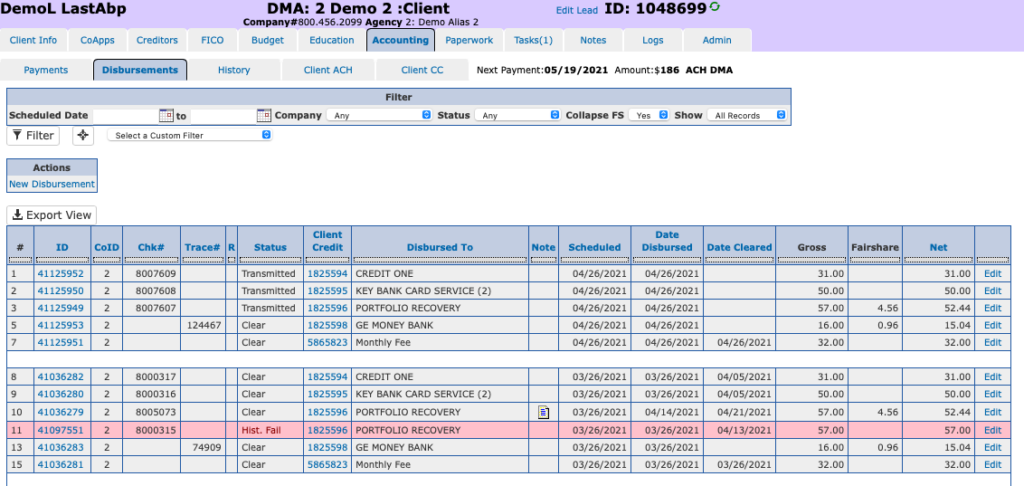
  • Filters have been added to the Disbursement tab for dates and to collapse fairshare. Collapsing fairshare displays gross, fairshare, and net columns for the primary Disbursement record.

Default view:

Collapsed FairShare view:

  • In addition, when a failed Disbursement is imported via a Check Return file or RPPS Return file and it is associated with a Cleared FairShare record, the system now automatically creates a Payment record of type Operating Account Credit in the amount of the Cleared FairShare. This allows the Client funds to be balanced and simplifies the process of dealing with this scenario.

ACH File Generation Updates

ACH files now support batching multiple sub-accounts within the same Financial Institution (Bank) in one NACHA file. Sub Accounts can be linked with a Parent Bank under System Management/Banks.

The DMA ACH Batch can now include LMA Payments so that only one ACH file needs to be created. This is accomplished by setting the Company filter to Any and the Include LMA filter to Yes.

Automated Reconciliation

Support to mark Cleared Payments and Disbursements as Reconciled has been added. A Reconciled transaction is no longer editable through the CMA.

There is a new Setting key: RECONCILE_ACCOUNTING_TRANSACTIONS_AFTER_N_DAY which is used to specify the number of days after which a Cleared Payment or Disbursement should be marked as Reconciled by the CMA’s daily job. To disable this job, set the value of the Setting key to 0.

Filters and columns have been added to the Payment and Disbursement reports. An R appears prior to the Status column for Payments and Disbursements when that transaction has been marked as Reconciled.

Extranet Packages

Video Overview of Extranet Packages

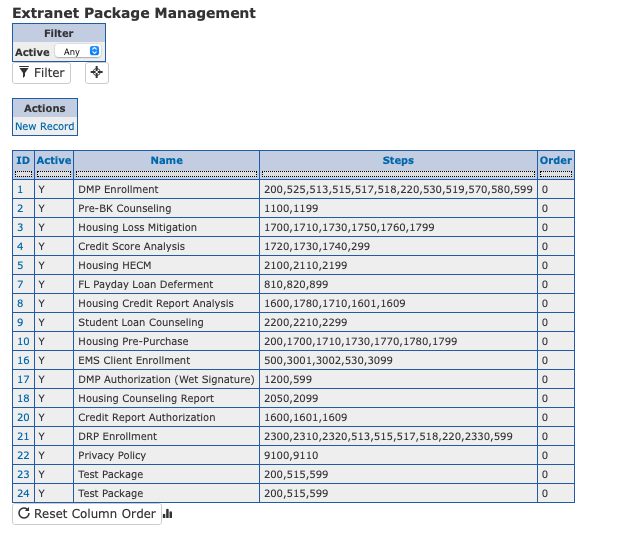
An Extranet Package is a collection Extranet Phases arranged in a specific order. It is used to provide a sequence of pages that are displayed to the Client through the Extranet.

New functionality has been added to allow simpler management of multiple Extranet Packages. Previously, Extranet Steps were defined either at the Agency or Company level. If multiple packages were desired, they would be combined into the existing extranet steps and a new start step would be selected by the User under the Client/Admin tab.

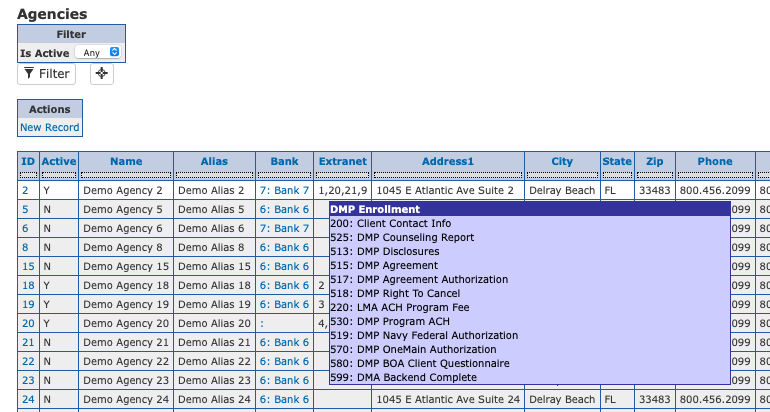
Extranet Packages simplifies this by creating system level packages similar to Document Transactions. Multiple Extranet Packages can be associated with either an Agency (so that they appear under the LMA Paperwork) or a Company so they appear in the Backend Paperwork.

Multiple Extranet Packages available in the LMA

New Feature: Client Referral Tracking

When adding a new Lead, there is a new field next to the Lead Source that facilitates stating the ClientID of the Client that referred this Client. In addition, there is a new report under LMA/Client Referrals that displays all Leads that have referred and have been referred by other Clients.

RPPS DMP File Format changes

The RPPS DMP File format has been updated work with the new Client Budget architecture. In addition, the Student Loan budget item is passed as a separate category. The computation of Total Debt to Income Percentage has been updated to be more accurate. Max repayment period for Hardship indicators A & C have been increased from 60 to 72 months to support Less than Full Balance indicators going live in October.

Creditor Page Changes

The Creditor fields are now grouped into different sections to make it easier to locate specific information. Fields have been added to track Creditor Policies/Benefits.

CSP Stats update in Client/Budget

A new CSP stats table to more accurately display number of enrolled CSP Clients for the month has been added to the Standard Budget. The table is automatically displayed when at least on account linked with the Client participates in CSP.

Changes to Fixed Payment Creditors

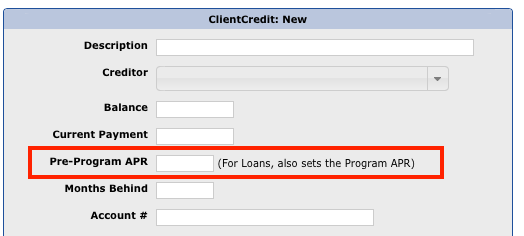
Creditors where payments are fixed, (i.e. Percent of Debt = No) such as Line of Credit and some Credit Union Loans now display the APR in the LMA. Previously, the APR was ignored and the value N/A was displayed in the Creditor table. Since some Loans apply an APR, it is more accurate for the Estimate table to display this APR.

When a Pre-Program APR is entered for a Creditor of this type, the Program APR is set to the same value so that the program estimates are accurate.

APRs of 0% can be entered as 0.

RPPS Trace and Batch numbers are Global

In order to prevent collisions of RPPS Trace numbers for Companies that share the same RPPSID, the RPPS Trace and Batch number fields have been moved from the Company table to the Settings table.

The new Settings fields are:
– RPPS_BATCH_NUMBER
– RPPS_TRACE_NUMBER

Import Return Files Changes

The process of importing RPPS and Check Return Files has undergone the changes described below.

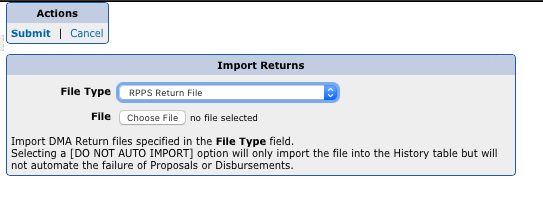
RPPS Return Files are now processed system wide so that a return file only needs to be imported once even if multiple Companies share the same RPPSID.

When selecting File Type of RPPS Return File, the Company Select is no longer displayed as it is not needed. The History record associated with this file is associated with the 0 Company.

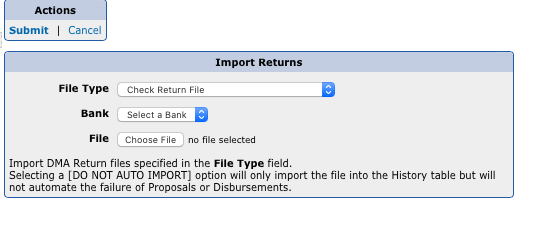
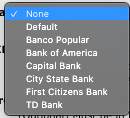
Check Return Files are now processed per Bank instead of per Company. After choosing File Type of Check Return File, a Bank Select box is displayed where Banks that have a Check Return File will be displayed along with their current check number.

Supported Check Return File types can be associated within the Bank record. Only Banks that are associated with a Check Return File Format are displayed int he Import Return Files page.

CERP Report

Updated: 2020.05.05

A new field have been added to the Creditor record:

  • Peregrin CreditorID (set manually)

The DMA / Client Creditors report has a new filter CERP Report. If set to Yes, only the CERP relevant columns are displayed in the report so that it can be exported and modified before uploading to Peregrin.

Prior to running the report, date filters and Hardship Indicators should be selected.

CERP Support

In order to support the Counselor Emergency Response Program (CERP), a new Hardship Indicator has been added to the CMA.

The three Virus Related Hardships (VRH) were already added as part of EMS support and are available under the Lead/Budget tab.

Steps required by the Agency

  • The hardship indicator should be added to participating Creditors using the DMA/Creditors view under the Hardship tab.
    Because this hardship is a deferral, all terms should be left at 0.
  • Add a new CERP Task with a due date of 45 days so that you can review the Client account prior to 60 days. Expire time should be set to 3888000 seconds.

To enroll a ClientCredit account in CERP:

This applies to 1b and 2b.

  1. change the Proposal Status to Queued
  2. change the Hardship Indicator to P: CERP
  3. remove the DMP BillerID to prevent the account from appearing in the RPPS DMP report
  4. create a CERP Task for the client to follow up prior to 60 days

Generating the Peregrin CSV file

Currently, the Peregrin CSV file should be populated manually as it may contain a mix of EMS and CERP proposals along with a reason code of 1a, 1b, 2a, or 2b, depending on whether this is an already enrolled Client.

As the file is populated, the ClientCredit Proposal status should be changed from Queued to Pending indicating that a response is pending from the Creditor.

To make it easier to identify which ClientCredit accounts are enrolled in a CERP product, the DMA/Client Creditors report has been modified as follows:
– added a Hardship Reason filter
– the Hardship Indicator filter now supports multi-select

EMS Support

This document outlines how to enable Extended Modification Solution (EMS) support in the CMA.

Add Hardship Indicator to Creditors

A new EMS Hardship Indicator with a value of “M” has been added to System Management/System Codes table:

This hardship indicator should be added to participating Creditors using the DMA/Creditors view under the Hardship tab. There, you can specify the individual Creditor terms specific to EMS.


New Client Hardship Reasons for COVID-19

In order to track Clients impacted by COVID-19, new Hardship Reasons have been added to the Hardship Reason Drop downs. These new reasons are mapped to existing RPPS codes 2 (Reduced income/unemployment) and 8 (Unexpected/Catastrophic Expenses)

Enroll a ClientCredit account in EMS

In order to enroll an existing Client’s account in EMS, edit the ClientCredit record in the DMA and
1. change the Proposal Status to Queued.
2. change the Hardship Indicator to M: EMS.
3. remove the DMP BillerID to prevent the account from appearing in the RPPS DMP report
4. update the Months Behind field to indicate current months behind in payment. (this field added 2020.03.30)
5. update the record (The CMA will automatically update the Program APR and new Monthly Payment. )

Tracking Charge Off Proposal Dates

The distributed EMS Calculator should be used to compute Charge Off dates.

A new Task called EMS Charge Off Proposal can be created using System Management/Task Management. This task can be created for Clients and linked to ClientCredit records to schedule when to transmit Charge Off Proposals for each ClientCredit account based on the date obtained from the EMS Calculator.

Identifying Clients enrolled in EMS

There are at least three methods that can be used to track Clients enrolled in EMS.

  1. If not using the Broker codes in the DMA, create a new Broker code under System Management/System Codes with a label such as EMS. Change the Client’s Broker code under the Client/Admin tab
  2. If using Broker codes for other purposes, create a new Agency and associate the Client with this EMS Agency
  3. If the above two options are used for other tracking purposes, you can create a Client Tag under System Management/System Codes. Client Tags are only displayed in the Client and DMA/All Clients views so its reporting capabilities are not as useful as using Brokers and Agencies.

Agreement/Extranet Package

The EMS Disclosure and Plan documents that need to be signed by Clients, can be added as Documents under System Management/Document Template Management.

The Documents can either be added as Extranet Steps using System Management/Extranet Phases and/or a printable package using System Management/Document Package Management (Document Transaction).

It is recommended that an ACH step is added to both the package and Extranet steps to get authorization for the new monthly payment amount.

CSP Multi-Tier Support

There is a new System Setting: IS_CSP_SUPPORTS_MULTIPLE_TIERS

If enabled:
– when sending a Lead package, the same tier is no longer required for CSP accounts
– any hardship indicator linked with the Creditor can be selected